
My Schedule Builder (MSB) is an online self-serve tool that helps plan your course schedule. View schedule options and create a timetable that works best for you. To access MSB, login to MyMRU and go to Register & Pay>My Schedule Builder. As MSB is a new tool, we'd appreciate it if you could provide feedback on your experience.
Build a schedule that fits your life with flexible course options>
Browse the Flexible Scheduling Course List for 4 p.m., online, Friday and evening course options.
Definitions and terminology
Reading my Schedule Builder
Registration
Tips for planning your schedule using My Schedule Builder
Frequently asked questions
Using My Schedule Builder
How to use My Schedule Builder to visually represent a semester timetable.
Definitions and terminology
CoRequisites - Similar to prerequisites, however, you can complete these courses in the same semester.
Course Attribute - A course attribute is a way of grouping similar courses. We use them in My Schedule Builder to indicate which courses can satisfy General Education requirements.
Favourites - This is a schedule that you’ve saved for later. You can save multiple favourites. It’s a good idea to save a couple of versions of your schedule in case you encounter a course that is full or has restrictions when you go to register.
Filter - The filter option is another way to limit your results. Available filters are:
- Full Classes
- Waitlistable Classes
- On-line Classes
- On-campus Classes
Note: disabling waitlistable classes also disables full classes, since a class can only be waitlistable when it’s full.
Full Classes - Classes where all the seats are taken. You cannot register for a course if it is full; however, you may be able to add your name to the waitlist.
Personal Times - These are times when you are unavailable to attend class, maybe because of work or extra-curricular activities. This time is a preference of time off and cannot always be accommodated based on the actual availability of the course(s). For example, if a course that you need to complete is only offered at 9 a.m. on Mondays and Wednesdays and you’ve indicated that you do not want to attend morning classes, you will still see the course as part of your possible schedule because it’s the only way it’s offered. However, if the course is offered multiple times, it will display the offerings that do not interfere with your personal time first.
Pin - Pinning a section locks that section in place and limits your available schedules to include only those schedules that fit with that particular section. This is a good way to narrow the number of possible schedules.
Prerequisites - Courses that you must complete before you can register in the next course.
Restrictions - Course restrictions limit who can take the course. For example, a restriction may indicate that only students in a given program / major are eligible to register in that section of a course. Restrictions are assigned at the section level, meaning some sections of a course may have a restriction, while others may not.
Schedule - Your schedule is the specific organization of course sections that you wish to take in a given semester. Many courses are offered multiple times and in multiple ways each semester, so in building your schedule you are determining which of those sections you wish to take.
Schedule Types - the different types of course sections that are available:
- (L) Lecture - Lectures are the regular classes you attend.
- (T) Tutorial - Tutorials are a required component of some courses, but may be optional depending on the instructor and course syllabus.
- (A) Lab - Labs are a required component of some courses. They provide a practical application of the course curriculum.
- (BL) Blended - Blended courses combine in-class lecture time with online lectures and assignments.
- (ON) Online - Online courses do not have an in-class component and are completed entirely online.
Sections - A course may be offered multiple times in a semester. Each offering is referred to as a section of the course. Sections vary by time, day of the week, or instructor.
Session - Not to be confused with Section, a session in My Schedule Builder refers to the type of schedule the course follows. Most courses follow a full-time schedule, meaning they run the entire duration of the semester. However, some courses will start late, have fewer hours, or run outside of the normal schedule. Think of a block format course offered before the semester starts. In these cases, we use session to differentiate the offerings.
Time Tickets - A Time Ticket is a Registration Access date. When registering, you may encounter an error message that says 'Time Tickets prevent registration' this means that you do not have a valid Access Date, and likely need to pay your Registration Deposit.
Waitlistable - A course will display as ‘waitlistable’ when it is full and you can add your name to the waitlist. Not all courses allow this, so we use this term to differentiate courses that can from those that cannot.
Reading my Schedule Builder
Welcome Page
This is the landing page when you first log in to My Schedule Builder.
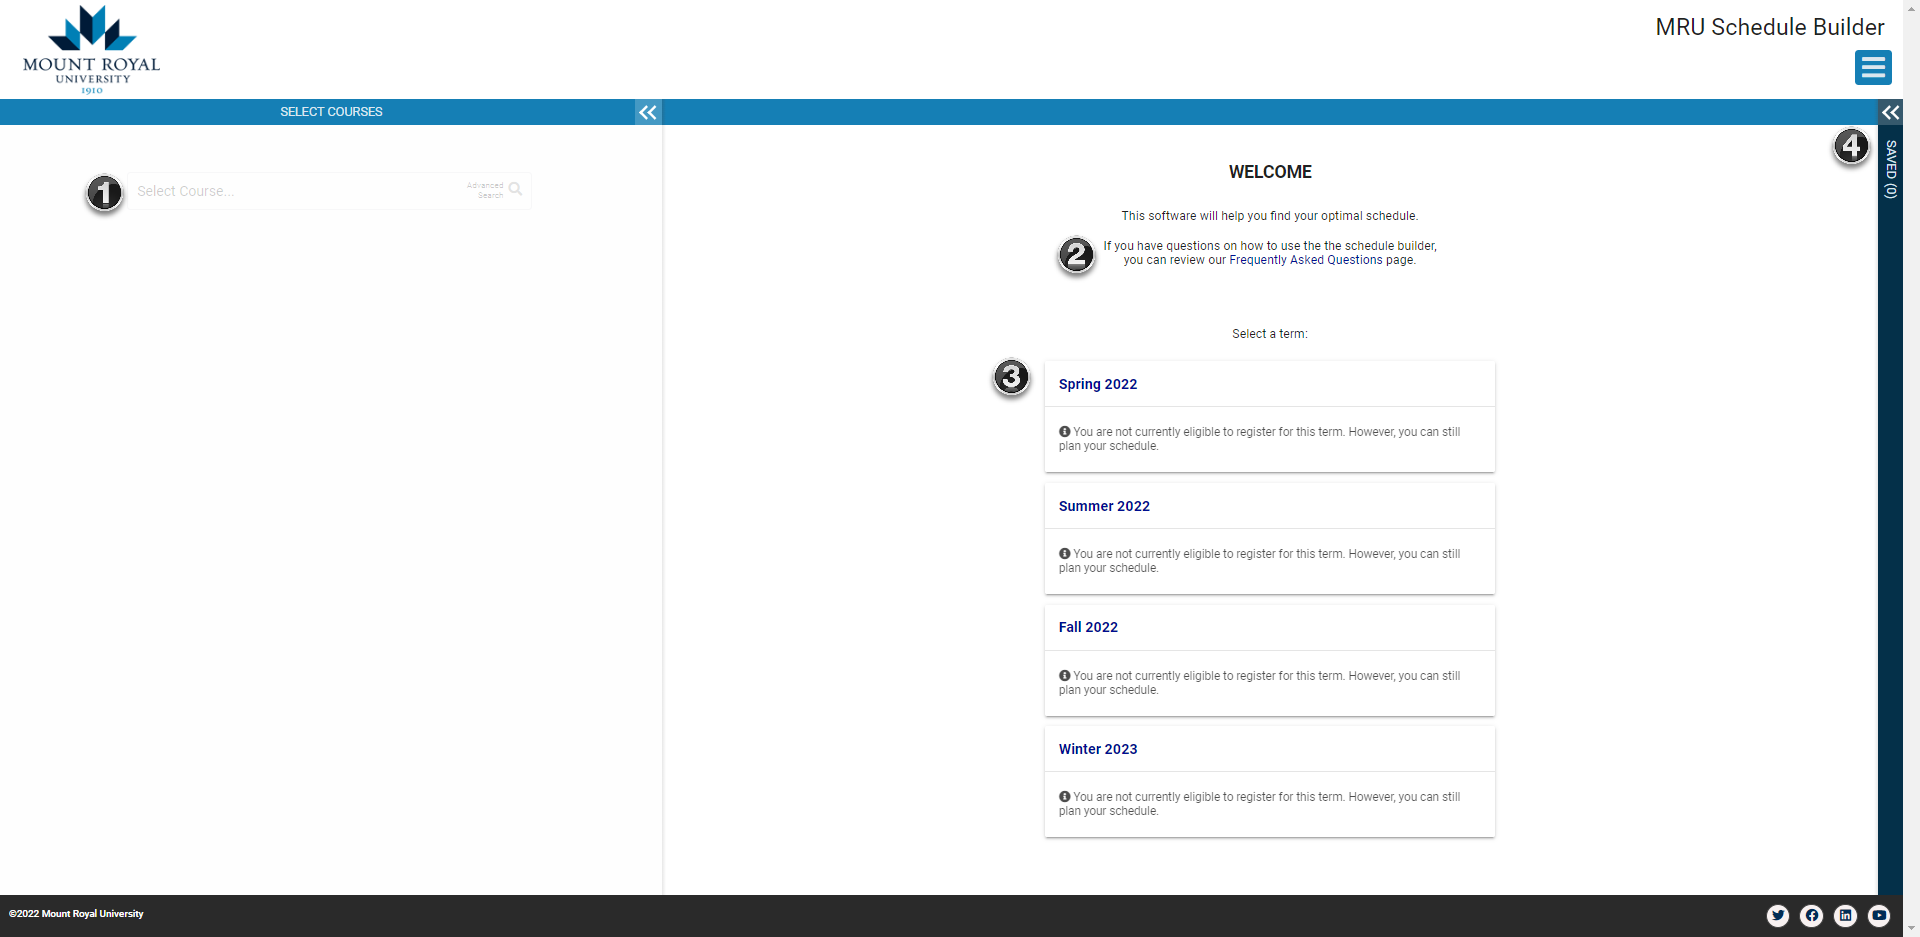
- This section is for guest access. It is greyed out if you are logged in with your account.
- Our Frequently Asked Questions page. You’re there now!
- Select the term you want to plan a schedule for. You can always plan your schedule, however, if you have any of the following messages, you will be unable to register:
- You are not currently eligible to register. This typically indicates that you have not paid your registration deposit for the term, you are before your assigned access date, or your status as a student is inactive (i.e. after taking a break from your studies).
- Hold present which prevents registration. This one is self explanatory. More information about your registration access or holds can be found on MyMRU>>Register & Pay
- Quickly resume a saved schedule plan using favourites.
Schedule Page with No Legend
Once you’ve selected a term, you will be taken to the main scheduling page. Here you can add courses and cycle through the possible schedules.

- This is where you search for courses to add. You can search by name, instructor, subject code, etc. Advanced search has a couple of extra options, like searching by Attribute codes (for example, GNED cluster/tier).
- The courses you’ve selected from your search appear here.
- Use the trash can to remove courses from your schedule.
- The current version of your schedule is listed in the calendar view here. This shows you the time of day and days of the week that the course will be offered.
Some courses have coloured bars on the left side to indicate status:
a. Red Bar = course is full and cannot be waitlisted.
b. Orange Bar = course is full and can be waitlisted.
c. No bar = course is available for registration. - These are all the possible scheduling combinations of the courses in your list. As you cycle through these, you’ll see the schedule change on the calendar view. The ones you see first are based on your sort criteria and any personal time off you’ve selected.
- This shows the duration of each course over the semester and is color coded to match the schedule. Most courses run the full semester, but any unusual start or end dates will be reflected here - for example, block format courses. Online courses are only displayed here, as they have no specific scheduled times during the day.
- The Legend toggle provides more detail about each section of the courses you’ve selected. More info below.
- You can select a sort criteria here, like M-W classes, or Evening classes, etc.
- You have limited filter functionality to exclude sections that are offered online or are already full.
- Select a new term from the dropdown. Warning, this will clear and reset your current schedule. Be sure to add it to Favourites if you want to keep it.
- You can add personal time to your schedule. These are times when you do not want to be in class, maybe because of work or extra-curricular activities. You can do this with the dropdown menu or by selecting and dragging blocks of time off in the calendar view. These times will be used to present you with the best schedules first. In some cases, you may wish to have mornings off, but the only time a course is offered is in the morning. In this case, you will still see this schedule, it will just be ranked behind other potential options.
- Relevant warning messages will display here about the courses you've selected.
- Once you have a schedule you like, you can save it here for later. It’s a good idea to save a couple of versions of your schedule in case some of the courses are not available when you go to register.
- Once you have a schedule you like, you can 'Get this schedule' and push your schedule to registration. More details on the registration steps can be found below under Registration.
Advanced Search
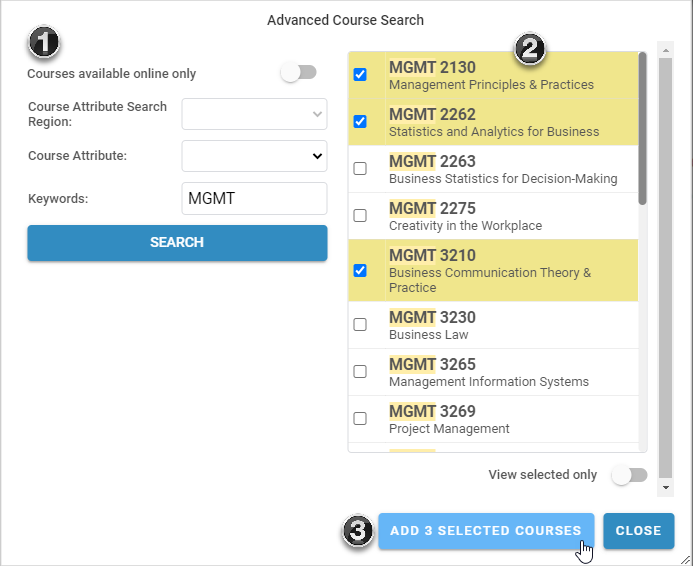
- Search Parameters - here you can put in keywords to search on. The keywords will match with course titles, subject codes, instructor names, etc.
You can also search by Attribute code. This is only for GNED attributes and can be helpful when looking for courses that can satisfy a GNED requirement. - Your search results will display here. You can check off the courses you want to add to your schedule.
- Click this button to add your selected courses.
Legend
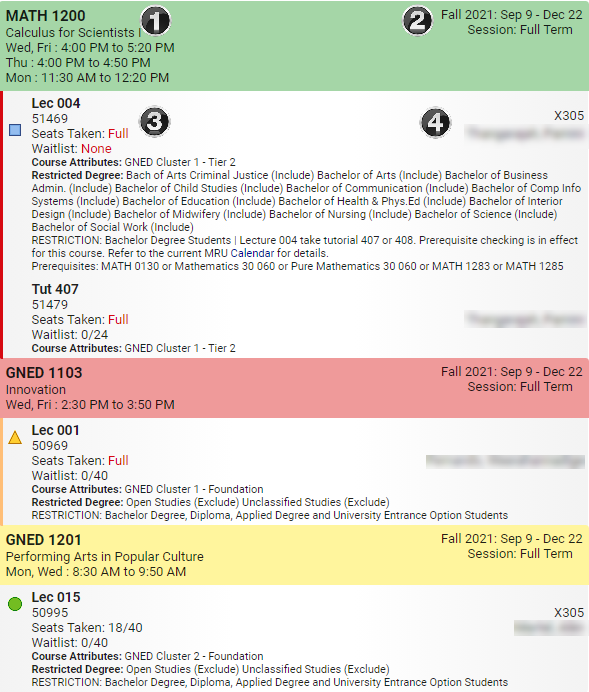
The legend provides section information about the courses currently displayed on your schedule. This is helpful for distinguishing labs and lectures, reviewing room numbers, or instructor info.
- Course information, including Subject / Course number, Name and course times.
- Term, duration and session type.
- Course information, like Type (Lecture, Lab, Tutorial), CRN (Course Reference Number), seat availability, waitlist, and attribute code (if available) or section Restrictions.
The shapes to the left (and the corresponding coloured bar on the left of the course in the schedule) indicate the status of the course:
a. Blue Square = Full and Not Waitlistable - course is full and the waitlist is full or not available.
b. Yellow Triangle = Full and Waitlistable - course is full, but you can waitlist in it.
c. Green Circle = Available - course has seats available for registration. - The room the course will be held in and the instructor.
Personal Times
You can add personal time to your schedule. These are times when you do not want to be in class, maybe because of work or extra-curricular activities. This can be a great way to prioritize the schedules you want. You can do this with the dropdown menu or by selecting and dragging blocks of time off in the calendar view.
These times will be used to present you with the best schedules first. In some cases, you may wish to have mornings off, but the only time a course is offered is in the morning. In this case, you will still see this schedule, it will just be ranked behind other potential options.
Personal times can be added in a number of ways:
- Drag and Select in the Calendar
- Manually entered in the Personal Times Field
If you enter the time(s) manually, there are a number of accepted formats for days and times.
- Days can use initials, abbreviations, or the full day ( e.g. F, Fri, Friday)
- Times can use am/pm or the 24-hour clock (e.g. 2-9pm, 8-10, 15-17)
Note: When adding times using the personal times field, any new times that overlap will replace the existing time. For example, if you have an existing time of Friday 1-5 p.m. blocked off and then you add in a new time of WF 12-3 p.m., the existing Friday 1-5.p.m. time will be deleted and replaced with the new Friday 12-3 p.m. time.
Registration
Selecting Get This Schedule will trigger the registration process which will attempt to register you into each of the courses listed on your schedule. The registration process performs a series of checks before completing registration. It checks:
- to ensure you are eligible to register
- to see if the course is available
- if you meet any course restrictions that may be present
Note: To Drop a course, first update your schedule by removing the course, then select Get This Schedule to finalize the drop process. You will follow the same steps as when you register for a course, but your options will say Drop rather than Web Registered or Waitlist.
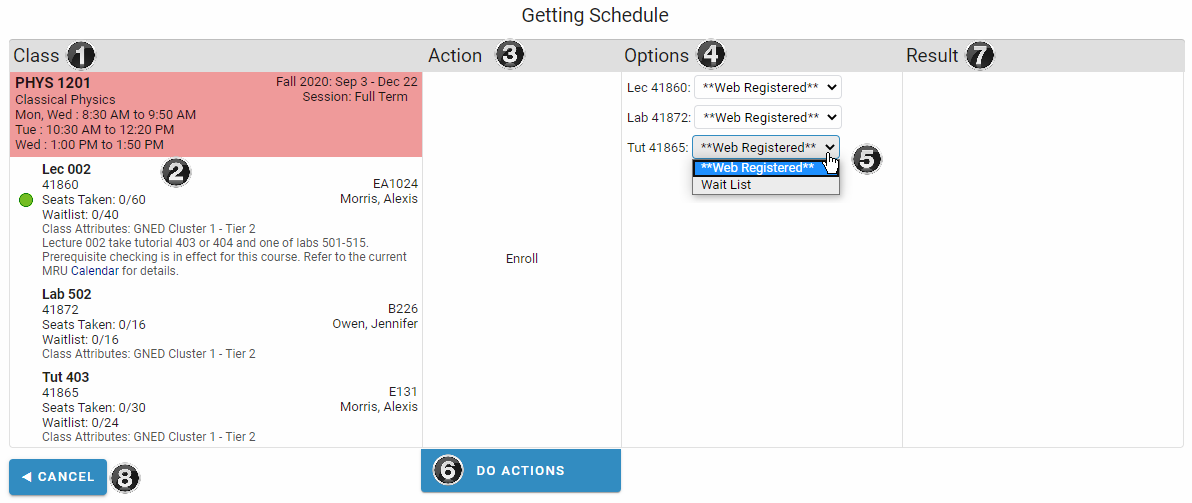
The Registration Page
-
- Lists the courses that are part of your schedule. Both existing courses (courses you've previously registered in) and new courses (courses you are going to register in) will be listed here.
- A summary of the course components (i.e. Labs, Lectures, Tutorials).
- The action you are intending to take. For a new course, the action will be Enrol, for an existing course, the action will be None (already enrolled in this class).
- The optional actions you can take. Including Web Registered, Waitlist, Drop/Delete.
- Web Registered means to register in the course. Waitlist will add your name to the waitlist. Drop/Delete will remove the course from your schedule. For courses that are full, the default option available will be Waitlist.
- Pressing the Do Actions button will perform the actions you've specified.
- Here you will see the results. Your actions can be successful or unsuccessful. The messages displayed are explained below.
- Returns you to the previous screen.
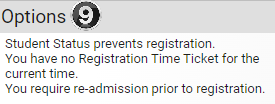
Registration Messages - Under Options, you may see messages that indicate you cannot perform the intended action.
- Student Status prevents registration: This message indicates that you are not eligible to register in this semester. This often indicates you have taken time away from your studies and your status as a student needs to be reactivated.
- You have no Registration Time Ticket for the current time: This message indicates that you do not currently have a registration access date for the semester. This often indicates that you have not paid your Registration Deposit yet.
- You require re-admission prior to registration. This message indicates that you have been absent for longer than the allowable period and need to reapply to Mount Royal to begin your studies again.
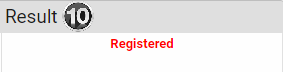
10. If your registration action was successful, you will see the Registered message displayed in your Result.
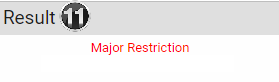
11. If your registration action was unsuccessful, you will see the reason displayed in your Result. A number of possible reasons may appear. In this example, we are not enrolled in the required major for the course
Tips for planning your schedule using My Schedule Builder
- Prepare a list of possible courses (e.g. MKTG 2150, ACCT 2121) to schedule, ranked by importance:
- Must Take - these courses must be taken in a specific term, possibly because they are needed as prerequisites for future terms, or the course is only offered once per year (e.g. LSCM 4409 is only offered in winter term, so it would be a ‘must take’ in your winter schedule).
- Recommended / Preferred - courses that you prefer to take in a given term (e.g. professor you love, friends in same section for group project, etc.).
- Alternates - courses you could take if one of the above courses is not available / working in your schedule.
- Open My Schedule Builder and choose the term you want to schedule.
- Start entering the courses you determined in step one in the Select Course... box. Alternatively, you can search by professor or subject to see an expanded list of possible offerings that term.
- Add the course(s). Adding a course here adds all sections of that course to your schedule. Note: By default, the schedule builder will display all sections, including those that are full, have course restrictions or prerequisites. You need to pay attention to these factors when building your schedule so you can be sure all courses will be available to you when you go to register.
- Use the Try all classes drop down option or check specific sections listed to limit your results to only include those sections. You may want to remove sections that are only offered online or those with program restrictions that you do not meet.
- Use the Legend to see more information about the course, including location, number of seats available or section restrictions.
- Pin courses with the fewest sections available first (i.e. if there is only one possible section, you will be in that section no matter your other preferences!). This will cause other courses to schedule around your pinned course(s), decrease the number of options presented, and will make finalizing your schedule easier.
- Use the Filter function to exclude some sections from your results. This will lower the number of possible schedules available. For example, you may want to exclude sections that are full or only offered online. Online sections are not recommended for students right from high school or students with low GPAs.
- Limit your choices by day / time using Add Personal Times. If a schedule is available that fits your personal time, you will see those schedules first. Otherwise, if there is no alternate schedule available, you will see courses listed within your personal time.
- Use the Sort By function to change the order course schedules are presented to you, based on your preferences.
- Considerations for filters / limitations to make:
- Evening sections – not recommended for students right from high school (filter out by using personal times function)
- Excluding Online sections also excludes blended sections.
- Block sections – not recommended for students right from high school, or students with low GPAs. You can use the calendar months at the bottom of the schedule to see when the course is offered.
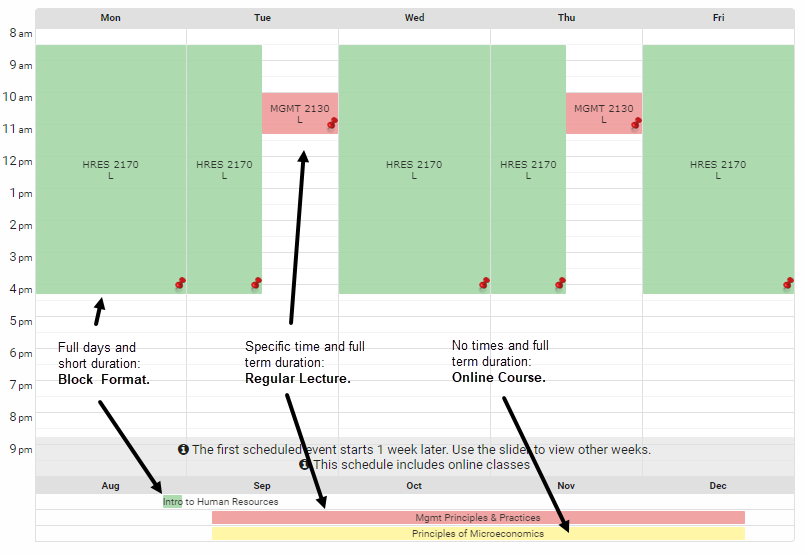
- This example shows the difference between a regular section, a block format section, and an online section to illustrate the relationship between the day/time and duration of a course.
Frequently asked questions
Q. I just entered the five courses I want to take for fall and it gave me 10 598 possible schedules. How is that helpful?
A. The number of schedules presented may seem overwhelming. However, you can pin courses, apply filters, add personal times, or sort by functions to start narrowing your possible schedules.
Q. I’m registering late and all the courses I need are full, what do I do?
A. Use the ‘full courses’ filter to exclude full sections. This will present schedule options based on sections that currently have room.
Q. Why does a course show as all day, every day (see sample above in the tips section)
A. A block format course, as we saw above, can display this way. The small pink block at the bottom of the screenshot indicates that the specific course section is just that one week in August, not all four months of the term.
Q. The CRN I entered in the search function was not found (or matched a different course than I expected). Why is this?
A. CRNs get reused from term to term, so it could be that the CRN you are looking up is for a different term than the one you are currently building a schedule in. Verify the CRN aligns with the correct term in your schedule.
Q. What do the coloured bars or different shapes that sometimes display next to my course mean?
A. The coloured bars and different shapes indicate the status of the course availability. Courses that have a red bar on the left of the course and a blue square next to the description indicate a course that is full and cannot be waitlisted. Courses with an orange bar and a yellow triangle indicate a course that is full, but the waitlist is still available. Courses with no coloured bar and a green circle are available for registration.
Q. I am not yet sure which GNED 12XX I want to take. How do I enter GNED 1201 OR GNED 1202 to find which sections work best for my schedule?
A. If you’ve pinned your other courses, you could add both sections and then see which schedule works best for you, or you may need to build/run two (or more) scenarios of your schedule using only one of those GNED 12XX courses in each scenario.
Q. I have blocked my personal times, but schedules with sections in those blocked-off times are still appearing as options.
A. Yes, the schedule builder does not eliminate sections in your personal times entirely (in case there is only one section choice for that particular course). If you no longer want that section to appear in scenarios, you should manually uncheck that section.
Q. I am entering my personal times manually. I have added MW from 7-8, and tried to add WF from 7-8. When I do this, the W from 7-8 disappears.
A. Each personal time is on an on/off toggle, so when you add WF, the W 7-8 restriction is already on, and so it turns it off. It might be easier to use the click and drag option to add personal times, rather than entering them manually.
Q. I have restricted/filters for online sections only, but none are appearing (and I know there are online sections available).
A. Those online sections are appearing as options, but they are hard to notice as they show as available sections, but with day/times blank. Online sections are noted at the bottom. Refer to the section on Tips for Planning Your Schedule for more details.
Q. The Welcome page says that I’m not eligible to register. What does that mean?
A. To be eligible to register for a term, you need to have paid your registration deposit and be past your assigned registration access date. Alternatively, you can look up your registration access date or pay your deposit here: MyMRU>Register & Pay.
Q. The Welcome page says that I have a hold on my account. What should I do?
A. For more information about holds on your account, visit MyMRU>Register & Pay>Before you register>Check holds.
Q. Do I have to use My Schedule Builder to build my schedule?
A. No, not at all. While we feel MSB provides value to students, it’s not required to build a schedule.
Q. Now that I have my schedule built, what’s next?
A. Once you have a schedule you like (and preferably, a backup or two), you need to log in to MyMRU and register for your courses.
- You can register via MSB by clicking "Get this Schedule". This will take you through the Registration process described earlier.
- You can register via MyMRU by following the steps below:
- Copy the list of CRNs from MSB, these are the specific reference numbers for the course sections you've selected.
- Go to MyMRU>>Register & Pay>>Register, Registration Landing Page.
- Select the term you are registering for.
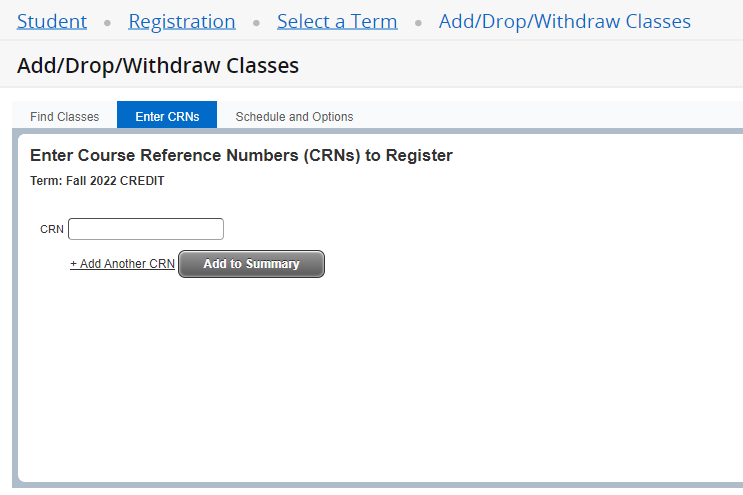
- Go to the Add/Drop/Withdraw Classes page and select the Enter CRNs tab
- Enter the first CRN into the box and select +Add Another CRN to add additional CRNs. Once all CRNs have been added, press Add to Summary.
- Once in your Summary your courses will be listed as Pending, you now need to choose which action to perform. In this case, you will select Register Web and press Submit. At this point, your registration will be validated for errors to ensure there is space available in each course.
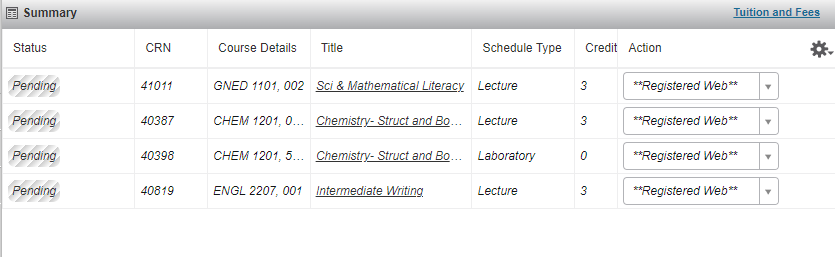
- Assuming everything goes well, your Summary will update and your status will now show you are registered in your courses.
When I went to register, it said my status prevents registration. What can I do? This means you have an inactive student status for that semester. Often, this means you took some time away from studies and were set to an inactive status. You need to contact Credit Registration to have your status reactivated.
When I went to register, it said time ticketing prevents registration. What is time ticketing? Time ticketing refers to your registration access date. To be eligible to register for a term, you need to have paid your registration deposit and be past your assigned registration access date. More information about registration access can be found here: Frequently Asked Questions
As well, you can look up your registration access date or pay your deposit here: MyMRU>>Register & Pay.
When I went to register, it said that the course was restricted. Why did MSB show me a course that I cannot register in? By default, the schedule builder will display all sections available, including those that are full, have course restrictions, or require prerequisites. You need to pay attention to these factors when building your schedule so you can be sure all courses will be available to you when you go to register.